| Author |
Message |
|
Spreadie
I haven't seen my friends in so long
Joined: Fri Apr 24, 2009 6:06 pm
Posts: 6355
Location: IoW

|
I'm throwing around some ideas for a Case mod, and I plan to create a dragon design on one of the side panels. The idea is to make the design out of drilled holes and back the whole panel with white acrylic, with inset LEDs to make it glow. I was thinking of something like this, maybe a little simplified, but I'm wondering if there is a way to recreate an image in an evenly spaced dot-matrix format to create a drilling template. Does that make any sense, and does anyone have a idea what application will do the job? Thanks all Dave
_________________
Before you judge a man, walk a mile in his shoes; after that, who cares?! He's a mile away and you've got his shoes!
|
| Fri May 04, 2012 2:35 pm |

|
|
|
cloaked_wolf
What's a life?
Joined: Thu Apr 23, 2009 8:46 pm
Posts: 10022
|
Surely a job for someone with a CNC machine or similar?
_________________ He fights for the users. He fights for the users.
|
| Fri May 04, 2012 2:40 pm |
|
|
|
belchingmatt
I haven't seen my friends in so long
Joined: Fri May 15, 2009 3:16 am
Posts: 6146
Location: Middle Earth
|
Or get a pre-drilled sheet and fill in the holes you don't want to use.
_________________
Dive like a fish, drink like a fish!
><(((º>`•.¸¸.•´¯`•.¸><(((º>
•.¸¸.•´¯`•.¸><(((º>`•.¸¸.•´¯`•.¸><(((º>
If one is diving so close to the limits that +/- 1% will make a difference then the error has already been made.
|
| Fri May 04, 2012 3:02 pm |
|
|
|
belchingmatt
I haven't seen my friends in so long
Joined: Fri May 15, 2009 3:16 am
Posts: 6146
Location: Middle Earth
|
Will you be using a couple of different pieces of perspex to allow a colour range? I can picture red and orange LEDs being used to simulate fire from a dragon's mouth, especially good if you can get them to dim in sequence. I started a case mod many years and never finished. The ex-wife got custody. 
_________________
Dive like a fish, drink like a fish!
><(((º>`•.¸¸.•´¯`•.¸><(((º>
•.¸¸.•´¯`•.¸><(((º>`•.¸¸.•´¯`•.¸><(((º>
If one is diving so close to the limits that +/- 1% will make a difference then the error has already been made.
|
| Fri May 04, 2012 3:13 pm |
|
|
|
steve74
Doesn't have much of a life
Joined: Fri Apr 24, 2009 12:43 pm
Posts: 1798
Location: Manchester
|
Just did a quickie test - found this simpler dragon graphic...  ...then I brought that into Photoshop, upped the resolution a bit, added a fade at the bottom of the neck, then tinted the dragon layer back to about 60% opacity (if you left it at 100% black, then next bit wouldn't work). I then copy-merged the result onto a new layer and played about with the 'Color Halftone' filter. The end result...  FULL SIZE VERSION IS HEREIs that the kind of thing?
_________________
* Steve *
* Witty statement goes here *
Last edited by steve74 on Fri May 04, 2012 3:21 pm, edited 1 time in total.
|
| Fri May 04, 2012 3:17 pm |
|
|
|
Spreadie
I haven't seen my friends in so long
Joined: Fri Apr 24, 2009 6:06 pm
Posts: 6355
Location: IoW
|
Yeah thought about that, but I thought it might look a bit naff in a dot matrix design. If I can't create the drilled design, I'll be going for laser-cutting; in which case I would use coloured pieces to create flames.
_________________
Before you judge a man, walk a mile in his shoes; after that, who cares?! He's a mile away and you've got his shoes!
|
| Fri May 04, 2012 3:20 pm |
|
|
|
belchingmatt
I haven't seen my friends in so long
Joined: Fri May 15, 2009 3:16 am
Posts: 6146
Location: Middle Earth
|
That contrast does funny things to my vision.
_________________
Dive like a fish, drink like a fish!
><(((º>`•.¸¸.•´¯`•.¸><(((º>
•.¸¸.•´¯`•.¸><(((º>`•.¸¸.•´¯`•.¸><(((º>
If one is diving so close to the limits that +/- 1% will make a difference then the error has already been made.
|
| Fri May 04, 2012 3:26 pm |
|
|
|
Spreadie
I haven't seen my friends in so long
Joined: Fri Apr 24, 2009 6:06 pm
Posts: 6355
Location: IoW
|
 Wow, that's exactly the kind of thing I meant. I need to learn how to use apps like photoshop. I imagine it's possible in Paint Shop Pro 9 too (which I own a copy of). Thank you Steve, I really appreciate your efforts.
_________________
Before you judge a man, walk a mile in his shoes; after that, who cares?! He's a mile away and you've got his shoes!
|
| Fri May 04, 2012 3:28 pm |
|
|
|
steve74
Doesn't have much of a life
Joined: Fri Apr 24, 2009 12:43 pm
Posts: 1798
Location: Manchester
|
No probs (kinda slow day at work!). Had a quick play with your original example but I had to tweak the head's position, moving it away from the neck more - otherwise it just sort of joined together! Also, filled in the neck to make it more of a solid shape. Anyway, here's the result...  FULL SIZE VERSION HEREIt depends on how intricate the drilling can be I guess, and how close the "grid" is - to make the holes further apart I think you'd tint the dragon back more (say, 25% to 40% opacity?) before you applied the 'Color Halftone' filter to achieve a more open effect. It's a trade-off between ease of drilling and how crude (or refined) the image is - somewhere in there is the right balance between a good image and it not being too hard to produce with your Black & Decker!! Here's a slightly coarser screen (grid) - simpler to produce maybe, but not as detailed as the one above...  FULL SIZE VERSION HERE
_________________
* Steve *
* Witty statement goes here *
|
| Fri May 04, 2012 3:52 pm |
|
|
|
Spreadie
I haven't seen my friends in so long
Joined: Fri Apr 24, 2009 6:06 pm
Posts: 6355
Location: IoW
|
Amazing! Thank you. I think the second one, with a smaller drill bit to increase the spacing slightly, will work perfectly. Going to need a new drill though - mine is a rechargeable one.
_________________
Before you judge a man, walk a mile in his shoes; after that, who cares?! He's a mile away and you've got his shoes!
|
| Fri May 04, 2012 5:17 pm |
|
|
|
steve74
Doesn't have much of a life
Joined: Fri Apr 24, 2009 12:43 pm
Posts: 1798
Location: Manchester
|
Ha, yeah you might need a better drill. The black and white dots make it look harsher than it will be when it's backlit - I think it will create a really striking effect. Would love to see the end result!
_________________
* Steve *
* Witty statement goes here *
|
| Fri May 04, 2012 7:22 pm |
|
|
|
cloaked_wolf
What's a life?
Joined: Thu Apr 23, 2009 8:46 pm
Posts: 10022
|
The problem with drilling it yourself is if you fudge up even one hole, it could ruin the effect.
Is there a way you could try it on a scrap panel and then use that as the template?
_________________He fights for the users.
|
| Fri May 04, 2012 8:47 pm |
|
|
|
Spreadie
I haven't seen my friends in so long
Joined: Fri Apr 24, 2009 6:06 pm
Posts: 6355
Location: IoW
|
Well, if I can pull it off without making a complete ar$e of it, I'll post some pics. It's going to be quite a while before I get that far though - I'm still sanding the case back down to bare metal and cutting radiator mounts etc.. ..or at least I will be if I ever get a free weekend without rain. SWMBO won't let me mod in the kitchen. Yep, that's the plan. I was thinking of using a sheet of acrylic, but a sheet of metal might be a better idea - more durable and thinner, so less likely to amplify any slight deviation of a drill hole into something noticeable. What I would give for a pillar drill or end miller.
_________________
Before you judge a man, walk a mile in his shoes; after that, who cares?! He's a mile away and you've got his shoes!
|
| Fri May 04, 2012 8:54 pm |
|
|
|
rustybucket
I haven't seen my friends in so long
Joined: Thu Jun 18, 2009 5:10 pm
Posts: 5837
|
Just a thought along the same lines: 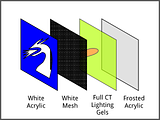 << It's a clicky This way you get a similar effect but without the problems of trying to drill in brittle acrylic. I propose the frosting to better scatter the light. _________________Jim
|
| Fri May 04, 2012 10:22 pm |
|
|
|
Spreadie
I haven't seen my friends in so long
Joined: Fri Apr 24, 2009 6:06 pm
Posts: 6355
Location: IoW
|
I absolutely agree about the frosted acrylic to diffuse the lighting, and shouldn't the frosted acrylic be on the other side of the light source?
Although if I had an idea what Full CT Lighting Gels are, I may be able to answer that myself. My google-fu has failed me again, what are they?
_________________
Before you judge a man, walk a mile in his shoes; after that, who cares?! He's a mile away and you've got his shoes!
|
| Sat May 05, 2012 12:16 am |
|
|


